Customizing Eclipse Che Cloud Development Environments
Eclipse Che provides Cloud Development Environments (CDEs) with a click. The default container of those CDEs, what we call the universal developer image, has a lot of pre-installed development tools but may not have the right version or the right tool for you. If that’s the case, no worries: one of Eclipse Che CDEs' main assets is configurability!
In this blog post we will review Eclipse Che CDEs' customization in 4 parts:
|
Note
|
To help illustrate this blog post we will use a Ruby on Rails project. Ruby is a good example because the default development container doesn’t include Ruby development tools at all. For other languages such as Java, Go, NodeJS, Python and .NET, the Eclipse Che default development image includes a few tools, and all the customizations in this blog post may not be necessary. |
PART 1: Eclipse Che default CDE
When no Devfile is found in a git repository and the developer doesn’t provide a URL, Eclipse Che uses a default development environment.
The
rails-sample
git repository has no devfile.yaml, and Che
informs us about that:
Devfile could not be found in https://github.com/l0rd/rails-sample. Applying the default configuration
|
Note
|
Click here to open https://github.com/l0rd/rails-sample in the Red Hat Developer Sandbox to try it out. |
Default CDE Pod details
Let’s have a look at the Kubernetes objects that get created when the default Eclipse Che CDE is started. From the Visual Studio Code Terminal we can list Kubernetes Pods:
$ kubectl get pod
NAME                                         READY   STATUS    RESTARTS   AGE
workspacef14b414e91574d61-675c894dbb-ch727   2/2     Running   0          2m
This is the CDE Pod. Then we can look at the images of the containers of the Pod:
$ kubectl get pods -o jsonpath='{range ..containers[*]}{.image}{"\n"}{end}'
quay.io/devfile/universal-developer-image:ubi8-latest
quay.io/eclipse/che--traefik:v2.9.10-8d81a9df1435f9f3d...
The first container image is
registry.redhat.io/devspaces/udi-rhel8 or
UDI (Universal Developer Image) and has a
default set of development tools. The second is
traefik, a
reverse proxy
that Eclipse Che uses to authenticate CDE users.
|
Note
|
You may see a different output. That’s because
Eclipse Che can be configured to use a different
default image. For example, on Red Hat Developer
Sandbox, the default image is
registry.redhat.io/devspaces/udi-rhel8.
|
Universal Developer Image
The default container image,
quay.io/devfile/universal-developer-image,
includes quite a few development tools: essential CLI
tools, popular programming languages and cloud development
tools. It’s called
Universal Developer Image and the following
diagram summarizes its content.
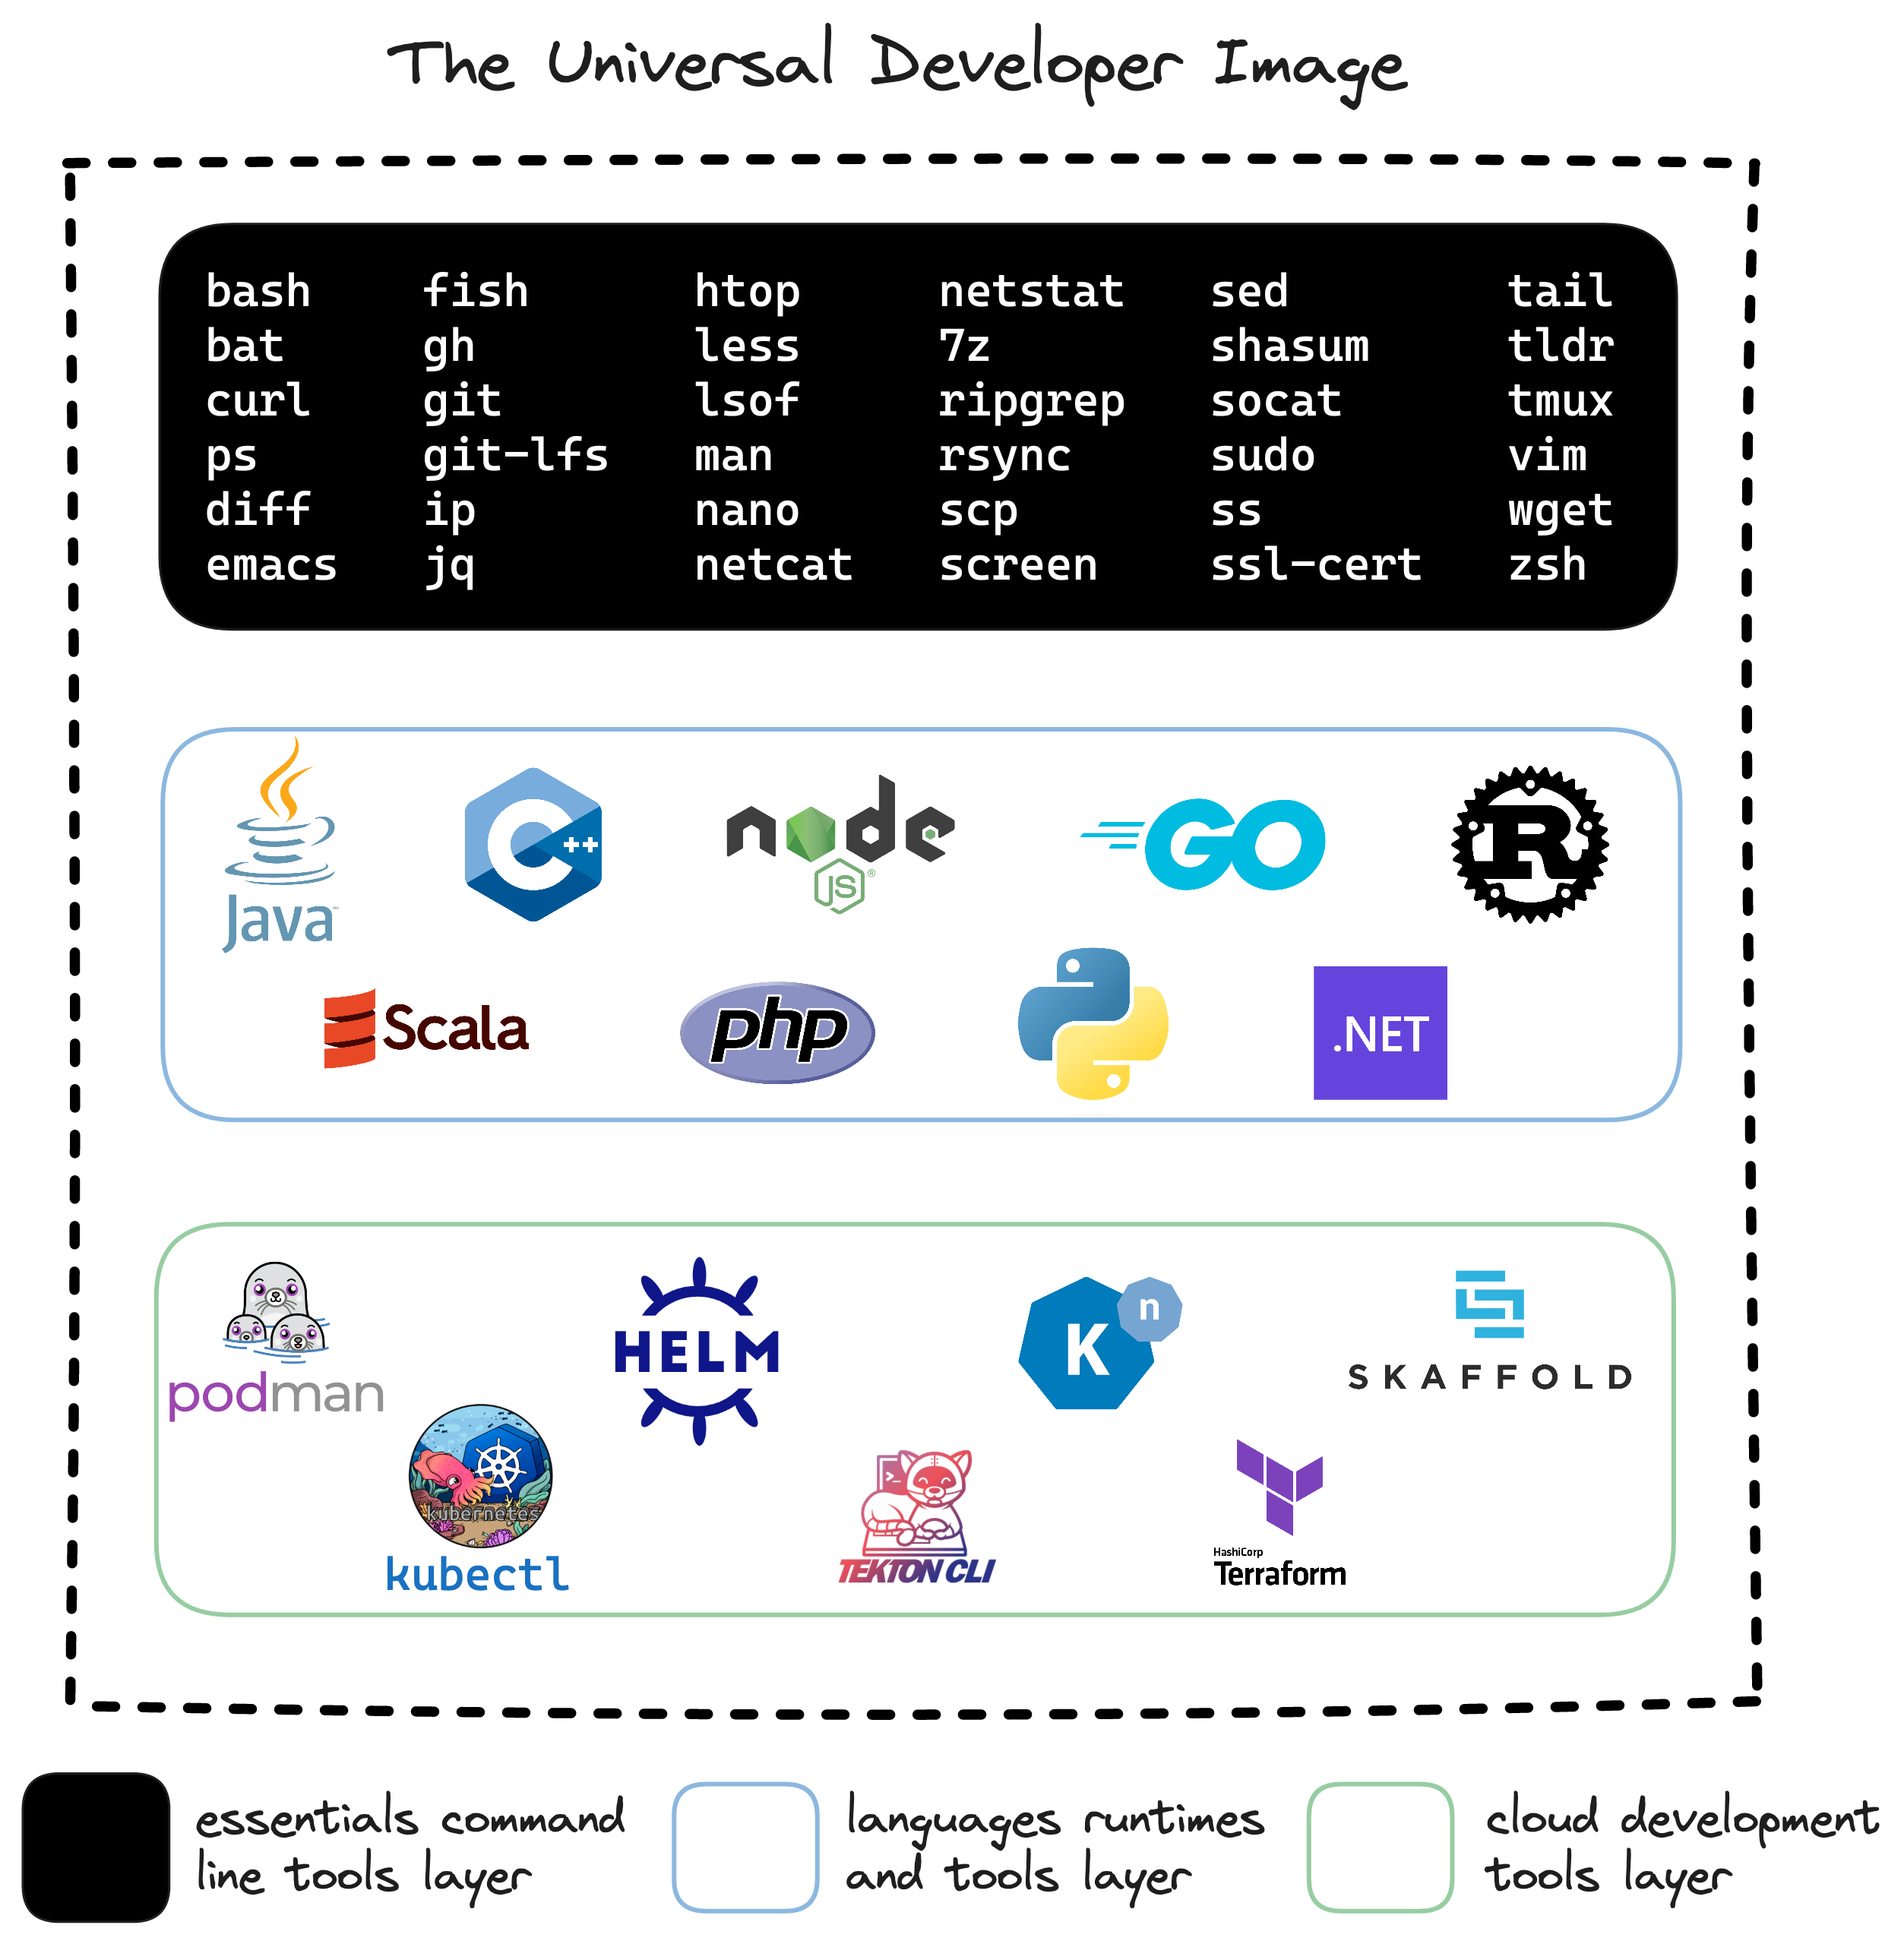
The Universal Developer Image
Dockerfile
has the details of all the tools, runtimes, environment
variables etc…that are included (here is the OpenShift Dev Spaces version).
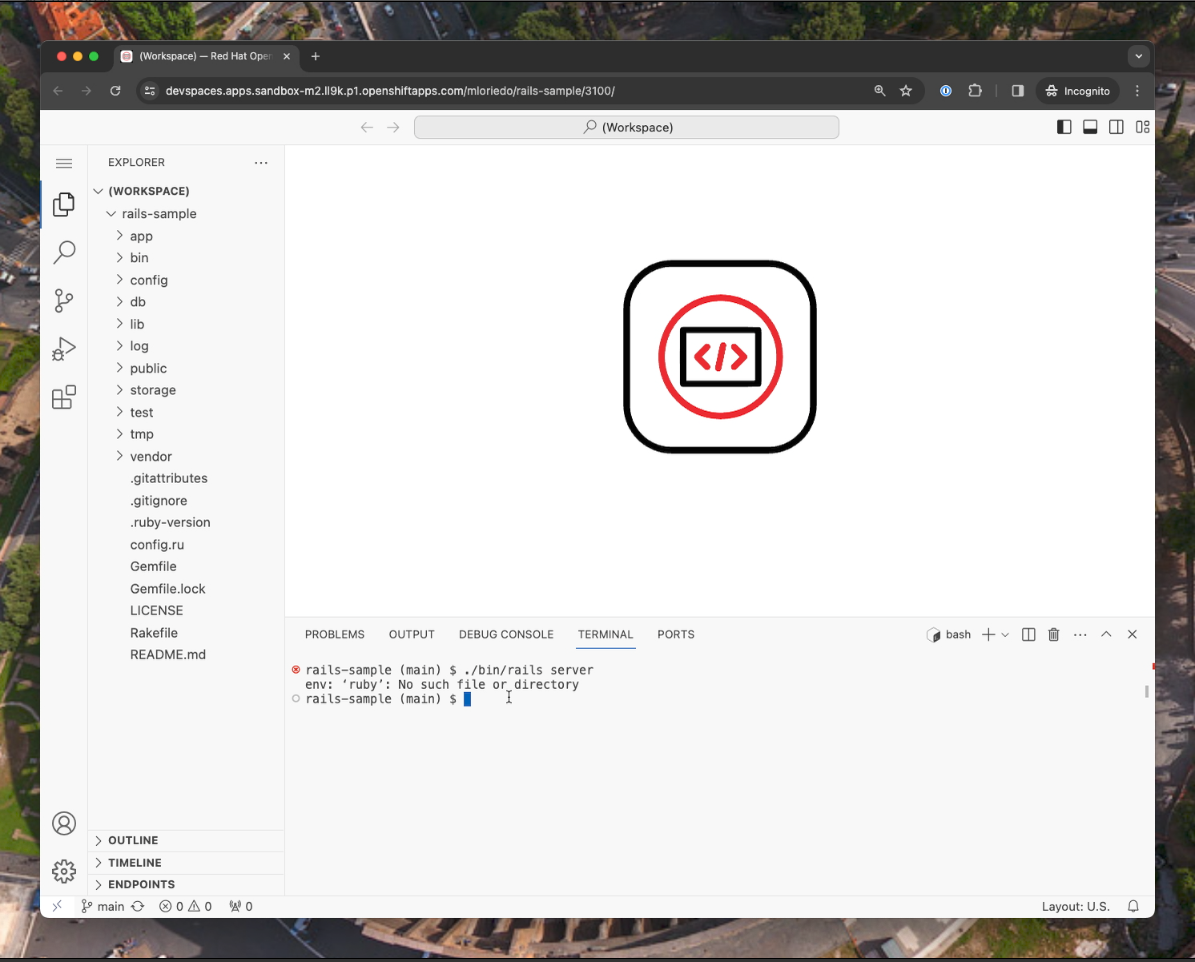
When the default is not enough
The configuration of the rails-sample Cloud
Development Environment is good enough for reading the
source code and doing some basic editing, but some
essential features of the IDE are missing:
Starting the rails application fails: Rails requires Ruby which is not installed in the default container.
The Ruby LSP extension activation fails: the extension from Shopify fails because Ruby is not installed.
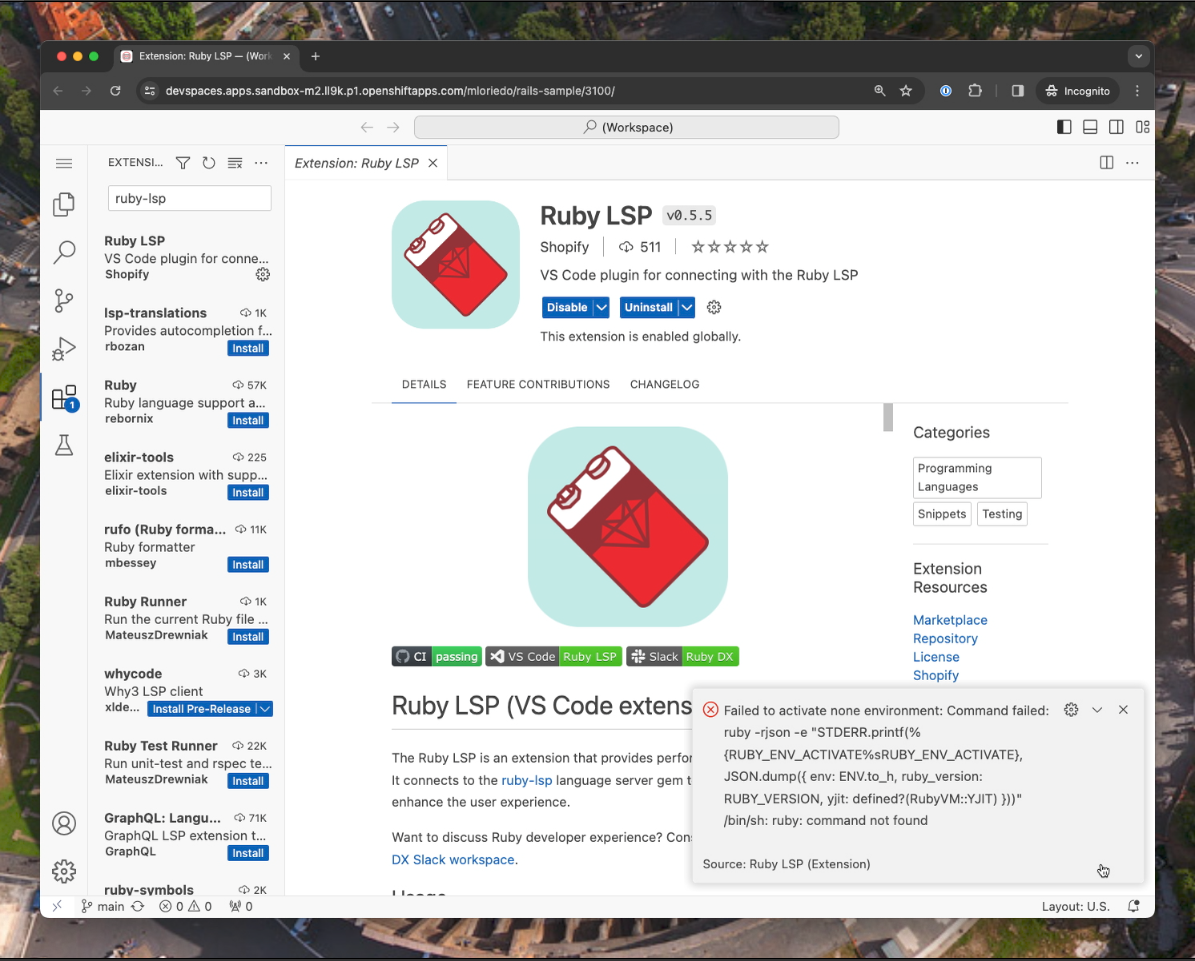
In PART2 we are going to address those problems by using a container image with the required development tools.
PART2: Customize the CDE container image
In PART 1 we have seen that Eclipse Che CDEs run in a container of a Kubernetes Pod. In this section we are going to see how to replace the default Eclipe Che CDE image with a custom one.
The Dockerfile
We want to build an image with the pre-requisite to run the ruby on rails example seen in PART 1. The following Dockerfile provides the specification of such image.
FROM quay.io/devfile/universal-developer-image:latest

# Switching to root user (setting UID to 0) because next
# commands require root privileges. Universal Developer
# Image default user has UID set to 10001.
USER 0

# Install a recent version of ruby
ENV RUBY_VERSION 3.1.2
RUN dnf -y update && \
    dnf -y install rbenv ruby-build sqlite && \
    dnf -y clean all --enablerepo='*' && \
    rbenv install $RUBY_VERSION && \
    rbenv global $RUBY_VERSION && \
    echo 'eval "$(rbenv init - bash)"' >> $HOME/.bashrc && \
    echo 'eval "$(rbenv init - sh)"' > /etc/profile.d/rbenv.sh

ENV PATH="${HOME}/.rbenv/shims:${PATH}" ENV="/etc/profile"

# Install rails
RUN gem install rails

# Switch back to default user
USER 10001

# Set bundle config
RUN bundle config --global path $HOME/.bundle
The base image in the Dockerfile above is Eclipse Che
Universal Developer Image
(quay.io/devfile/universal-developer-image:latest).
The remaining instructions in the Dockerfile install
ruby and rails.
|
Note
|
It’s not necessary to use the Eclipse Che default image as the base image. I am maintaining a repository with a list of Dockerfiles for Che CDEs using popular base images. |
Build and publish the custom image
The Dockerfile can be built locally (on your laptop) and
pushed to a remote registry such as Docker Hub or Quay.io.
That requires docker or
podman and a good Internet connection (the
base image, UDI, has a size of a few Gigabytes).
Another option is to build and push the
Dockerfile without leaving the
ruby-sample CDE started in STEP1.
podman is included in the universal developer
image and can be used to build and push the Dockerfile
above.
My preferred alternative though, and the one used in
branch dockerfile of the ruby-sample
repository, is to leverage GitHub actions to automatically build
and push the image:
-
Add the Dockerfile to the git repository as
.devfile.Dockerfile -
Add a GitHub workflow to build and push the image automatically (see an example here)
-
Push both files to a remote branch of the git repository
Last step will trigger the GitHub action job that builds the image:

As a result the image will be built and published on
quay.io automatically after every push to the
repository. The job in the
branch dockerfile of the ruby-sample
repository
builds and publishes the image
quay.io/mloriedo/rails-blog-cde:latest.
|
Note
|
I have named the file as
.devfile.Dockerfile: even though any name
is ok, I like to use the .devfile prefix
as these images are usually used in devfiles (as we
will do STEP 3).
|
Start a new CDE using the custom image
The simplest way to start a workspace using a new custom
image is to use Eclispe Che URL parameter
?image=<image-name>.
For example, to start a CDE using the custom image
quay.io/mloriedo/rails-blog-cde and cloning
rails-sample, the following string can be used in the
"Create Workspace" page:
https://github.com/l0rd/rails-sample&image=quay.io/mloriedo/rails-blog-cde
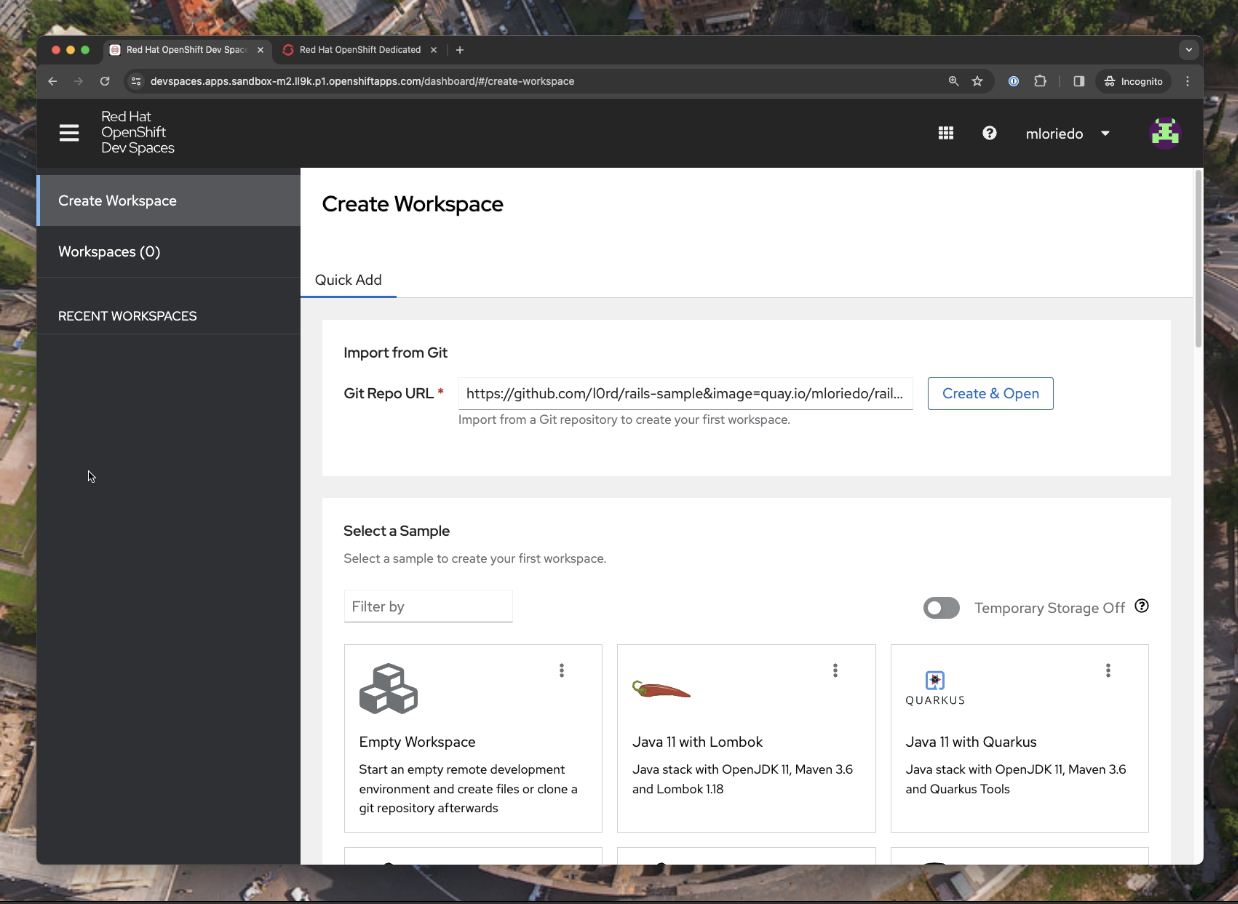
Clicking on this URL automatically starts the customized CDE on the Red Hat Developer Sandbox.
Verify the new CDE Pod image
The CDE Pod now uses a
rails-blog-cde container rather than the
Eclipse Che default universal developer image. To verify
it open a Terminal from Visual Studio Code and run
kubectl:
$ kubectl get pods -o jsonpath='{range ..containers[*]}{.image}{"\n"}{end}'
quay.io/mloriedo/rails-blog-cde:latest
quay.io/eclipse/che--traefik:v2.9.10-8d81a9df1435f9f3d...
Run Ruby on Rails from the Terminal
We can verify that the
rails-sample application starts successfully
from the Visual Studio Code Terminal:
$ bundle install && ./bin/rails server
(...)
=> Booting Puma
=> Rails 7.0.8 application starting in development
=> Run `bin/rails server --help` for more startup options
Puma starting in single mode...
* Puma version: 5.6.8 (ruby 3.1.2-p20) ("Birdie's Version")
*  Min threads: 5
*  Max threads: 5
*  Environment: development
*          PID: 4119
* Listening on http://127.0.0.1:3000
* Listening on http://[::1]:3000
Use Ctrl-C to stop
Install ruby-lsp Visual Studio Code extension
Finally, the Ruby LSP extension, which failed to activate in STEP1, is now fully working:
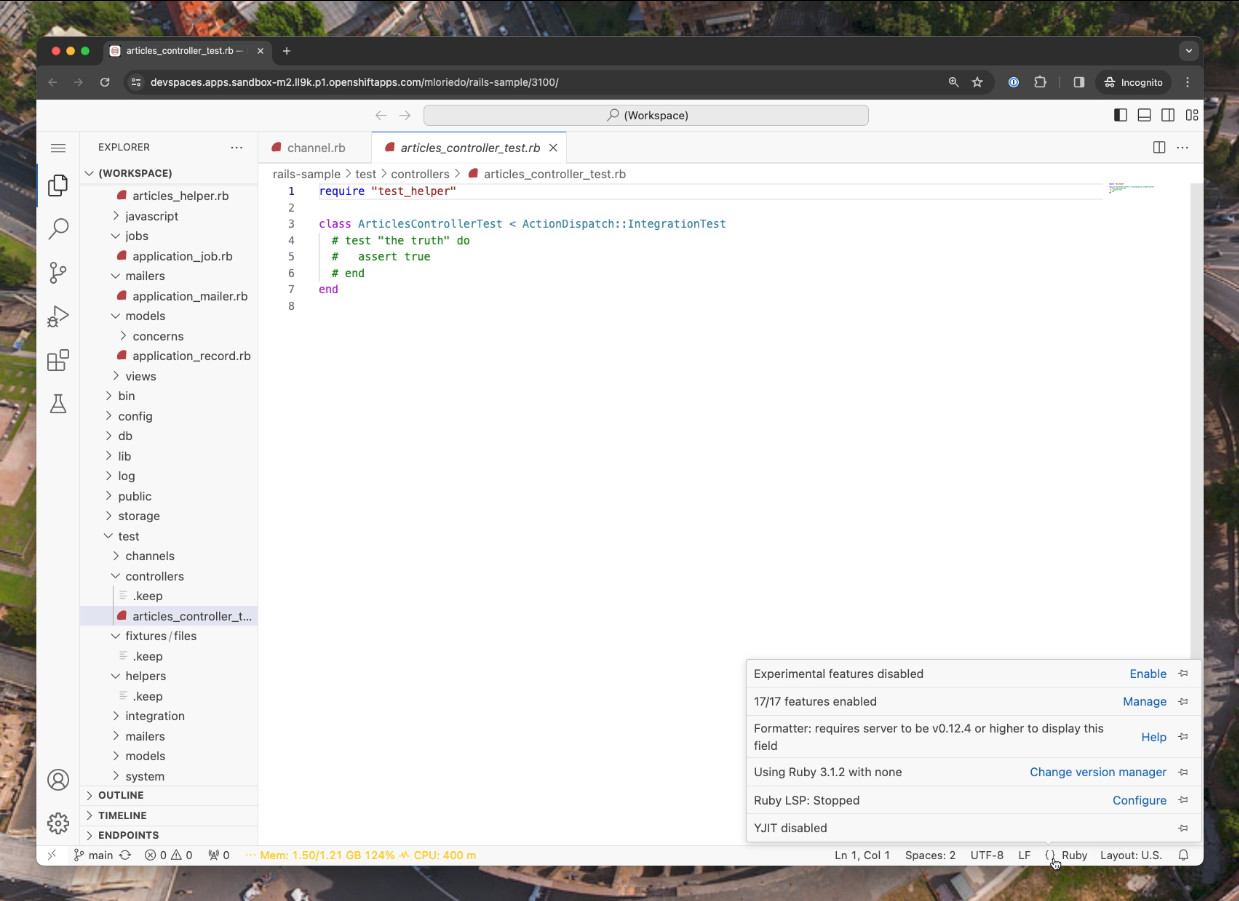
Replacing the Eclipse Che default image with a custom one
allowed us to include the right pre-requisites (ruby and
rails) to the CDE. With that, we are able to run the
application and the Visual Studio Code ruby extension.
But there are still some issues with the CDE that we would like to fix (e.g. CPU and memory are not enough, running the application is not automated, the application dependencies are not pre-fetch at startup etc…). We will cover those in the next session where we will use the Devfile to perform more advanced configurations for the CDE.
|
Tip
|
We have seen how to replace the image of the CDE
using a URL parameter. We will see in the next
section that it can be done with a Devfile too. A
third alternative is changing the image "on the
fly" using |
PART3: Change CDE properties with a Devfile
In Part 2 we have seen how to customize a CDE with a new container image. That helps to include some development tools that are not in Eclipse Che default environment.
But what about properties such as the required memory or CPU, the containers to run in the CDE Pod (a CDE can have multiple containers!), the exposed endpoints, the commands triggered at startup, at shutdown? These properties can be customized using a Devfile and in this Part 3 we are reviewing how to do that.
Define a Devfile for an Eclipse Che CDE
A Devfile is an open standard to define Cloud Development Environments. It’s a YAML file used to configure Eclipse Che CDEs.
Here is a simple Devfile that specifies the container image built in STEP 2:
schemaVersion: 2.2.0
metadata:
  name: rails-sample
components:
  - name: devtools
    container:
      image: quay.io/mloriedo/rails-blog-cde:latest
It’s recommended to add the Devfile in the same git
repository of the application being developed using the
name .devfile.yaml (as in the
devfile branch of the
rails-sample). A Devfile in the git repository will evolve along with
the application and will be applied automatically whenever
a developer provides the git repository URL to start a
CDE.
When it’s not possible to add a
.devfile.yaml in the git repository, there is
still the option to publish it (in a gist, pastebin or
another git repository) and
start the CDE by providing the raw URL to it.
|
Tip
|
To change the configuration of a running CDE, add a
new .devfile.yaml (or edit the existing
one), and restart the CDE using the command
Eclipse Che: Restart Workspace from Local
                            Devfile
from the Visual Studio Code command palette. This
command is also quickly accessible by clicking on the
bottom-left corner of Visual Studio Code.
|
|
Tip
|
The Devfile Visual Studio Code walkthrough extension helps generating a Devfile using a GUI wizard. |
Step by step guide to an optimal Devfile
The
documentation website
includes a detailed Devfiles syntax reference. In this
section I will share a practical step by step guide to
write an optimal Devfile for the
rails-sample.
These steps can be tested iteratively from a running CDE using the "Eclipse Che: Restart Workspace from Local Devfile" command in Visual Studio Code. You get the best experience installing Visual Studio Code YAML extension that provides code completion when editing a Devfile.
After the last step, the CDE will be fully functional. After the Devfile has been pushed to the git repository any new contributor will be able to run the application, do some changes, and debug them in a flash.
For example you can use
this link
to test the rails-sample using the Devfile in step 7.
After the workspace has started, use task
server-start in VS Code (Terminal ⇒ Run
Tasks ⇒ Devfile) to start the Ruby on Rails
application. And install the VS Code extension
ruby-lsp to get full language support.
PART4: Secrets and other CDE configurations that cannot be specified in Devfile
There are some properties of your CDE that you don’t want to specify in a Devfile. Either because they contain sensitive information (like a password or an SSH private key), or because you want to customize your CDE without affecting the rest of the team. In any case the Devfile, which is a shared in the git repository, cannot be used. In this section we will go through a few techniques to add user specific configurations.
|
Important
|
Secrets, ConfigMaps and other Kubernetes objects mentioned in this PART are supposed to be created, by a developer, in the developer namespace. This is not admin tasks. Other developers using the same Eclipse Che instance won’t "see" those objects and their CDEs won’t be affected. |
Add environment variables using Kubernetes
ConfigMaps and Secrets
The Devfile allows to specify environment variables but in some situations you don’t want to add them there. Eclipse Che provides a mechanism to automatically add variables to CDEs containers without Devfiles but using Kubernetes ConfigMaps or Secrets.
Using ConfigMaps
It’s possible to use a Devfile to add an
environment variable such as
RAILS_DEVELOPMENT_HOSTS=.apps.che-dev.x6e0.p1.openshiftapps.com
that holds the URL of your specific Kubernetes cluster.
But that would make the Devfile less portable.
A better approach is to create, in your namespace (the
developer namespace where your CDE are created), a
ConfigMap with labels
controller.devfile.io/mount-to-devworkspace:
"true"
and
controller.devfile.io/watch-configmap: "true"
and with the annotation
controller.devfile.io/mount-as: env:
kubectl apply -f - << EOF
apiVersion: v1
kind: ConfigMap
metadata:
name: workspaces-env-vars
labels:
controller.devfile.io/mount-to-devworkspace: "true"
controller.devfile.io/watch-configmap: "true"
annotations:
controller.devfile.io/mount-as: env
data:
RAILS_DEVELOPMENT_HOSTS: ".apps.che-dev.x6e0.p1.openshiftapps.com"
EOF
The environment variables specified in the
data field of the
ConfigMap (in this case
RAILS_DEVELOPMENT_HOSTS=.apps.che-dev.x6e0.p1.openshiftapps.com) will be added automatically to every CDE created in
the same namespace.
Using Secrets
An example of environment variables holding sensitive
information are those that specify developers' tokens
(for example GITHUB_TOKEN used by the
GitHub CLI).
In this case, we can create a Secret with
labels
controller.devfile.io/mount-to-devworkspace:
"true"
and
controller.devfile.io/watch-secret: "true"
and with the annotation
controller.devfile.io/mount-as: env:
kubectl apply -f - << EOF
apiVersion: v1
kind: Secret
metadata:
name: workspaces-env-vars
labels:
controller.devfile.io/mount-to-devworkspace: "true"
controller.devfile.io/watch-secret: "true"
annotations:
controller.devfile.io/mount-as: env
stringData:
GITHUB_TOKEN: "<your token>"
EOF
The environment variable specified in the
stringData field of the
Secret (in this case
GITHUB_TOKEN=<your token>) will be
added automatically to every CDE created in the same
namespace.
|
Tip
|
These ConfigMap and Secret should be created in the
developer namespace. The variables specified in
data will be added to the CDEs of the
owner of the namespace only. Eclipse Che uses
namespaces to isolate developers CDEs: it’s
critical to allow read access to the objects in the
namespaces only to the developer owning it.
|
Add files to a CDE using Kubernetes
ConfigMaps and Secrets
Regular files can be projected into CDEs using
ConfigMaps and Secrets too. In
this case the required annotation is
controller.devfile.io/mount-as: file.
When projecting files, there are two extra annotations
read by Eclipse Che:
controller.devfile.io/mount-path:
<container-path>
specifies the projected file folder, and
controller.devfile.io/mount-access-mode
specifies the projected file’s access mode.
Using ConfigMaps
The following ConfigMap projects a Visual
Studio Code settings.json file (remote VS
Code data folder is
/checode/remote/data/machine) that
specifies a couple of Visual Studio Code Terminal
settings:
kubectl apply -f - << EOF
apiVersion: v1
kind: ConfigMap
metadata:
name: vscode-settings
labels:
controller.devfile.io/mount-to-devworkspace: "true"
controller.devfile.io/watch-configmap: "true"
annotations:
controller.devfile.io/mount-as: file
controller.devfile.io/mount-path: /checode/remote/data/Machine/
controller.devfile.io/mount-access-mode: "511"
data:
settings.json: |
{
"terminal.integrated.copyOnSelection": true,
"terminal.integrated.cursorBlinking": true
}
EOFUsing Secrets
The following Secret projects file
credentials in fodler
/home/user/.aws:
kubectl apply -f - << EOF
apiVersion: v1
kind: Secret
metadata:
name: aws-credentials
labels:
controller.devfile.io/mount-to-devworkspace: "true"
controller.devfile.io/watch-secret: "true"
annotations:
controller.devfile.io/mount-as: file
controller.devfile.io/mount-path: /home/user/.aws/
controller.devfile.io/mount-access-mode: "511"
stringData:
credentials: |
[default]
aws_access_key_id = ABCDEFGHILMNOPQRSTUVZ
aws_secret_access_key = ABCDEFGHILMNOPQRSTUVZ123456789+abcdefg
EOFOverride defaults configurations using a DevWorkspace Operator Configuration
In this last section we want to show a mechanism that a developer can use to override CDEs' default properties. In this case, by using a DevWorkspaceOperatorConfig Custom Resource.
DevWorkspaceOperatorConfig objects specify
advanced CDE properties such as the Pod
schedulerName, whether the
/home/user folder will persist after a
restart or not, and many more.
Applying a particular
DevWorkspaceOperatorConfig to a CDEs takes 2
steps:
-
Create the
DevWorkspaceOperatorConfigcustom resource in the Kubernetes cluster -
Edit the Devfile to apply that specific configuration
For example the following
DevWorkspaceOperatorConfig override CDEs Pod
schedulerName configuration:
kubectl apply -f - << EOF
apiVersion: controller.devfile.io/v1alpha1
kind: DevWorkspaceOperatorConfig
metadata:
name: custom-dwoc
namespace: <namespace-name>
config:
workspace:
schedulerName: my-scheduler
EOFTo use this configuration a Devfile needs to reference it. For example:
schemaVersion: 2.2.0
metadata:
  name: rails-blog
+ attributes:
+ controller.devfile.io/devworkspace-config:
+ name: custom-dwoc
+ namespace: <namespace-name>
components:
...
With that attribute, the CDE started using this devfile
will use the scheduler my-scheduler (if it
exists) rather than the default Kubernetes scheduler.
|
Note
|
If the DevWorkspaceOpenratorConfig referenced in a Devfile doesn’t exist in the Kubernetes cluster, then Che will silently ignore it. |
Conclusion
Most of the time, the Eclipse Che default Cloud Development Environment (CDE) that we have covered in PART 1: Eclipse Che default CDE, is good enough to start navigating and doing some simple editing of the source code.
To build and run an application in a CDE, it may be necessary to create a custom container image to replace the default one. This is described in PART2: Customize the CDE container image.
But it’s in PART3: Change CDE properties with a Devfile that we shared how to make to most out of Eclipse Che development environments. The Devfile allows us to specify development environments as code and share it with the rest of the team.
Finally, in PART4: Secrets and other CDE configurations that cannot be specified in Devfile, some more advanced techniques to configure development environments, beyond the devfile, are reviewed.